
Ever since I can remember, I have always wanted to take pictures of the stars, the Moon, and the planets. If you own a DSLR camera or a point and shoot with a variable zoom, or even a pair of binoculars that you’ve held a smartphone too, I’m sure that every once in a while you’ve looked up at the Moon and you’ve thought about taking a picture of it, especially when the moon is full and bright, and low on the horizon on a crisp, clear night. The Moon is a wonderful object to photograph with its constant changes of view throughout the lunar cycle from crescent to full, capturing the detail as the ‘terminator’ shadow as it sweeps across the surface. It is the ideal practice subject to develop lighting techniques, ISO ranges, shutter speeds and aperture settings. First and foremost, taking a photograph of the Moon, or the night sky, comes down to a single technique: the timing of long/short exposure photography (open your camera’s shutter and let the light pour in over a long period of time, or shorter time, instead of the standard open and close it would normally do).
There are three essentials to any moonshot kitbag; [1] You can take good images of the Moon with just a single lens reflex (SLR) camera and a lens with at least a 200 mm telephoto range. To get the best detail, you need a telephoto lens of at least 500 to 600 mm and ideally a long focal length telescope: I use a Sigma 50-500mm f/4-6.3 EX DG HSM lens and I’d certainly recommend it. [2] A tripod: As the moon is exceedingly bright against the night sky a tripod isn’t necessarily essential (I have rested my camera on window ledges, and garden tables) however, it does provide you with that questionably steady shot. [3] A remote shutter release cable: I’ve shot using the built-in timer capability most cameras have, however when taking a long exposure, pressing down on the shutter can shake the camera leading to a blurry image. Using a remote stops this from happening. I’d recommend it.
Choosing a location
Choose a location that allows an unobstructed view of the Moon for several hours and try to set up far away from buildings and other sources of heat, is perfect. Although the Moon can be visible at any time of day or night, the surface contrast is lower during daylight, making focusing difficult at that time. If you want to capture a series of shots to build up a mosaic image, ensure similar light conditions throughout the entire shoot. This will reduce the amount of processing required later. But, you can shoot the Moon anywhere so it depends solely on the type of shot you wish to shoot (mosaic, wide-angle, or one shot).

One Shot example – image credit: pcdphotography
Shooting the Moon
First, make sure your camera is set to shoot in RAW instead of JPEG. This will allow you to be more selective with the light you want to enhance in post processing. If you are using an SLR, a long focal length telescope and a tripod, then shutter speeds of 1/30th of a second is perfectly fine. If you have taken a picture of the Moon and it looks in the picture like a white circle rather than the Moon (no craters etc), it is because the Moon was overexposed. Use a low ISO setting to reduce noise and prevent bright details burning out.
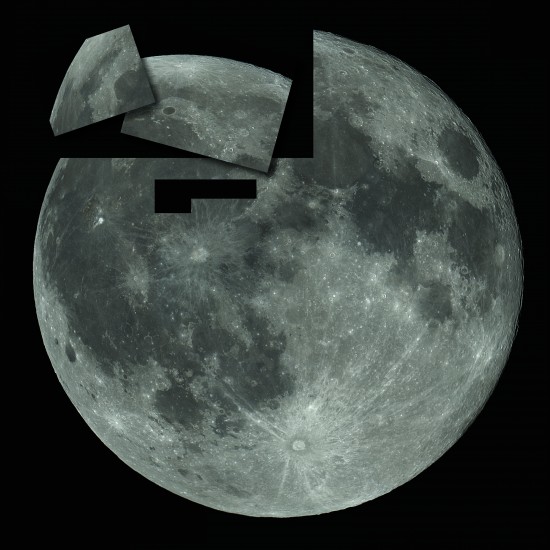
To sharpen the details of the Moon’s surface in your photograph you have the option to shoot a series of close-up shots of the moon and combine them in a single, detailed mosaic via the use of a telescope. You can also reduce the effects of atmospheric turbulence (for several hours after sunset the Earth is still hot and can cause the Moon to appear as if it is shimmering. It is often the case to let the Earth cool down and therefore head out later into the night to achieve your shot rather than the evening). One way around this it a take a series of Audio, Video Interleave (AVI) files, as it will be easier to process several AVI files rather than hundreds or thousands of individual high-resolution shots.
To achieve this; Imagine a grid or net of squares across the Moon and start at the terminator (the edge of shadow across the moon) and set the focus. If you can, zoom in to ensure that the focus is as sharp as possible. Set the exposure and move around the rest of the Moon’s surface, adjusting the shutter speed until there are no saturated areas. Your camera settings will probably give exposures of about 30 frames per second (without the use of a remote shutter release cable where you can set the exposure time to ‘bulb’ and open the shutter for as long as you require). Although, these may make the shadow section and cratered areas of the Moon appear very dark, which is better than having overly bright areas.
Returning to one end of the shadow, capture your first AVI file and the load the file into a manual stitching program like iMerge or Fitswork and move the telescope to the next small grid square section of the Moon to build up a rough mosaic. In total record a series of about 25 AVIs, each of which makes up around 1000 frames.
If you’d like to shoot a traditional shot, a ‘point and click’ shot of the Moon in its entirety within one photograph, try these settings to get you started:
- Camera Mode: Set your camera mode to full Manual Mode.
- ISO: Set your ISO to 100 if you have a Canon DSLR and to 200 if you have a Nikon DSLR, the lowest ISO you have in your camera.
- Aperture: Set your aperture to f/11.
- Shutter Speed: Set your shutter speed to 1/125 on cameras with base ISO 100, and to 1/250 on Nikon DSLRs with base ISO 200.
- Lens Focus: Set your lens to manual focus and set your focus to infinity ( ∞). Be careful while setting the focus to infinity, as some lenses allow focusing beyond infinity, as mine does. Try setting your lens to the center of the infinity sign, then take a picture and see if it came out sharp by zooming into the image via the rear LCD of the camera.
Processing your photograph
Each AVI file will need to be converted into a single solitary image, which is then spliced with the other images you have shot to produce a seemless mosaic of the Moon. There are plenty of YouTube tutorials out there that can help you along the way with whatever question or concern you may have from setting up to finally processing your images into a panorama. Imaging software such as RegiStax 5.1 (free) can be used to stack your AVIs into individual high-resolution images and iMerge to stitch or splice them together. Finally, when you have your image (captured via the mosaic technique or taken as singular shot) use Adobe Photoshop to and it’s tools such as lens correction to fix distortion and vignetting. Adjust exposure slightly to desired brightness/intensity. Increase the sharpness being careful not to increase noise. Slightly desaturate the image found within layer adjustments.
Wrap up warm and happy shooting!
